Purchases - Goods In
INTRODUCTION
After a Draft PO has been verified by the supplier and then finalised the next stage is for the supplier to despatch the goods and to be booked into the company adding stock levels for the goods.
SECURITY
Additional System Parameters – Purchases Tab
If set you must enter a valid user identity.
CREATE GOODS IN
Go to Purchases - Orders - Goods and Services Agreed
The
cursor will start in either the User Id
field or the Supplier field
depending on whether the parameter Mandatory
Receive By is checked or not.
You
may now either enter the Supplier account
number ( or use look up) or if you know the Purchase Order number enter it in the Purchase Order field (or use
the look up). If you enter the supplier the look up for the PO number will be
restricted to just those POs open for the supplier.
Depot
will default to the default depot. You can change it to any other depot on a
wide area network. If the depot is remote i.e. not on the same computer network
as your depot you cannot receive goods for that depot.
Date of Receipt
will default to the current processing day. Amend this if required
Delivery Note:
This is a mandatory field for the
supplier’s delivery note number.
On
selection of the PO the grid will be populated with details of the purchase
order. For our example we will use the PO we created earlier in this chapter.
If you remember we created a note to be displayed on goods in. Before any data
is loaded the system will check for any notes to be looked at. In our example
therefore we would see the following message
Notes
If you press Yes the notes screen is
automatically opened
If you cannot read this note
double-click on it to load into the text field at the bottom of the screen. The
Notes screen can be opened at any
other time to add notes if required. See Para 43 of this chapter.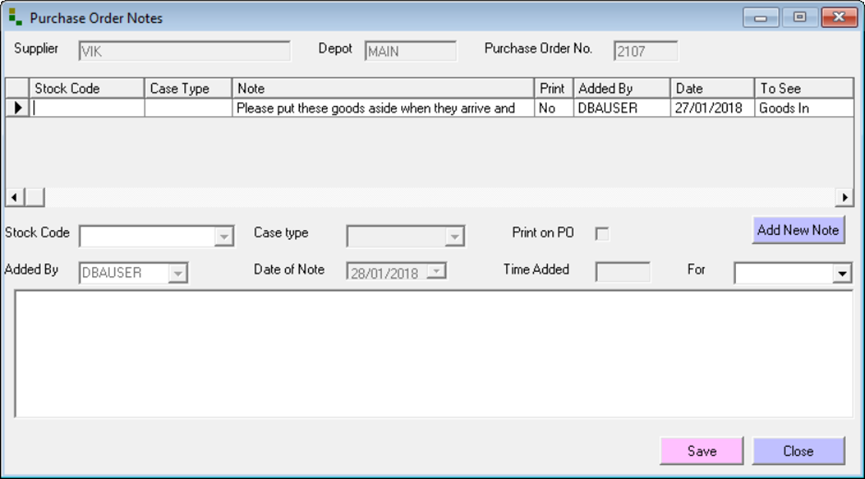
If you cannot read this note
double-click on it to load into the text field at the bottom of the screen.
The
Notes screen can be opened at any
other time to add notes if required.
Once
any notes have been viewed the data is populated as follows:
You will see
that for goods in fashion items are now presented in one line per colour and
size.
To receive goods either press Receive All or go through the order
line by line to receive the items.
To
receive items individually click on the line. Rec’d Today will automatically be set to Qty Ord (less Qty Rec’d
if this PO has already been part received)
If the quantity delivered is less
or more than the quantity ordered click on the line again. The system will
prompt ‘Do You Wish To Remove The Quantity Received?’ Answer yes and the cursor
will be in the Rec’d Today field and allow you to manually enter the quantity.
If
you are receiving a volume stock item i.e. timber when you click on the line
the following screen is displayed
When you open this screen the
system will automatically set Qty Rec’d
Today to the Qty Ordered less
any Qty Received. You can edit the
number of lengths if required. If another length has been delivered by the
supplier you can click on Add Length
to add another length to the order for receipt.
ADD ITEM
It
is possible at this point to add another stock code.
This might be necessary
if a substitute product has been sent by the supplier .
This will open up the standard Add Item
screen as described in Creating a Purchase Order.
In this example we will add a
batch-tracked item.
This is an item such as animal feeds or medicines that you
are legally required to track by batch number from receipt to sale or disposal
of.
The
added item will appear at the end of the order
EDIT ITEM
You may also want to edit an existing item in
the order. Press this button to display the following screen
You can edit the Quantity and
Price fields on this screen (Price only if you have the correct security
level). Note that if you have already received part of this line at one price
you will no longer be able to edit the price.
SAVE
When
you have entered all the stock you want to receive click ion the Save button. If the stock you are
booking includes batch tracked items you will be prompted to enter the batch
details at this point
Enter the
fields as follows
·
This is the batch number of the stock delivered.
·
Quantity in the batch. Note that this is in singles so make sure
you enter the correct quantity.
·
A batch tracked item may also have an expiry date after which it
can’t be sold. If the item has been set up in this way the Expiry Date filed
will be enabled.
The system will not allow you to exit this screen unless you have
entered batches with quantities that add up to full amount. Once any batch
items have been entered the system will book everything into stock.
If
you have the parameter XXX set the system will now prompt you to print barcode
labels that when created have their label type set as Individual Labels i.e.
attached to the product as opposed to shelf labels
If
Agility is integrated to the EiTrax
document management system a barcode label will be printed that can be stuck
onto the delivery note prior to scanning. This enable you to see the scanned
document directly from within Agility.
If
you use the sales order process to
sell your products instead of EPOS the system will now allocate the stock
booked in against sales orders. The following screen is displayed to show all
allocations.
Stock is allocated on a first come basis. This screen allows
you to amend the allocations. See Agility Professional Sales Manual for more
information on Sales Orders
CLOSE RECEIPTS FOR PO
You can book stock in against a purchase order
as many times as you like until all stock has been ordered. This is not the
case however if the No Back Order
flag is set for your supplier. On the first Save the system will automatically
adjust the PO so that no more stock can be booked in. If this flag is not set,
you may know that no mote stock is to be delivered. In that case by clicking
the Close Receipts for PO button you
can manually reset the PO to stop further receipts
RECEIPTS TO DATE
Click this button when opening a PO a second
time to book in stock to display all stock already booked in.
This screen displays all stock
booked in to date with the delivery note number and date of delivery.
If you
have Eitrax document management
system clicking the Show Goods In
button will display the scanned goods in delivery note.
REVERSE GOODS IN
Sometimes you may make an error booking in
stock. Agility has a goods reversal option to correct this type of error.
Navigate to the Goods in screen and then enter the PO number in the purchase order field.
Select the line with the error and click on Reverse Goods to display this screen
Enter the quantity to be reversed
out and click Reverse.
Related Articles
Purchases - Purchase Returns
INTRODUCTION When doing purchases there are many times that a company needs to return goods and in Agility Professional this can be done. Agility works on different stock types: R = Purchase Returns - When goods are being returned S = Standard Stock ...Purchases - Authorise Invoices
INTRODUCTION After adding invoices and credits either connected to a Purchase Order or Direct another step is the process to authorise invoices for payment when they have been put under query. Both invoices from purchase orders and direct invoices ...Purchases - Credit Notes Direct
INTRODUCTION Just as you may get an invoice that does not relate to a Purchase Order so you may also get a Credit Note that does not relate to a Purchase Return. However many direct credit notes may relate to a Debit Note raised as a result of a ...Purchases - Cash Matching
INTRODUCTION Cash Matching is the allocation of payments you make to suppliers to invoices from suppliers. If you make payments through the ‘Pay To Suppliers’ screen the payment is automatically matched. However, it is possible to make a payment to a ...Purchases - Credit Notes For Returns
INTRODUCTION Now the supplier has collected the goods and now sent a Credit note which now needs to be recorded in Agility Professional. CREDIT NOTES This screen processes the return linking it to the original Purchase Return. For our example we will ...